The N scale EMD FP-45 was released in PMI and LIMA in the 70s and 80s, but since it has not been reproduced recently, it is best to make it using a resin plastic body made by JnJ Trains. It was common.However, the body alone cost nearly US$20, and since it was a LIMA replica, the details were not very good, so I couldn't really recommend it.
Meanwhile, I suddenly discovered FP-45 in a preview of ``Railways of the World''. I thought, ``This looks like it could be useful.''
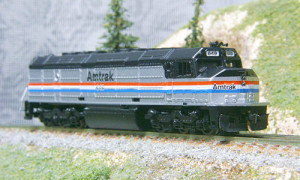
FP-45 first meeting
I found this at my local Tobu Books on my way home from work.When I opened the door, I saw an FP-45 that was bigger than JnJ. ``I can use this!'' I immediately got two cars and left the bookstore feeling excited.
This is a little off topic, but what surprised me was a photo from a magazine.The photo and model did not match.The photo on the cover is General Electric's DASH 8-32BWH, which is a relatively new diesel locomotive.The model FP45 is a long-ago locomotive made by EMD from the passenger Santa Fe era.Well, I don't mind because I prefer the FP-45, but I just mentioned it briefly for those who don't know.
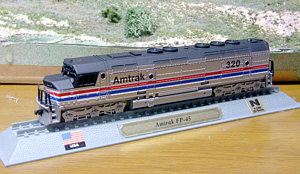
And one more thing.Amtrak's FP-45 does not exist.However, since it looks similar to the actual vehicle SDP40F, FP-45 is often used as a substitute in the model world.
Diecast scary
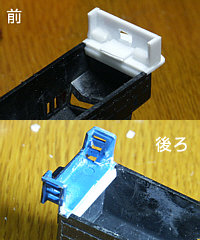
最初は、トレーラー車にでもなれば、という思いだったので、カプラーを変えれば良いだろうと思っていました。が、なんとカプラー取り付け部まで金属。ダイ キャストとは聞いていたものの、ここまで金属とは(汗) 加工が困難になりそうだったので、ボディーシェルのみ使おうとばらしました。す、するとなんと デッキはシャーシと一体。つまりデッキは金属でした。 結局、デッキも自作する羽目に。ショックのあまり、その日は寝込んでしまいました(ホントかよ)
First, create a deck (Platform)
実車の写真をご覧いただくとわかるように、アムトラック仕様の機関車には、前面に手すり(handrail)がありません。ということで、厚さ1mmのプ ラバンを数枚組み合わせて、右の写真のように接着。プラバンだけではモロそうだったので、角棒を使って接着面を大きくし補強しました。ちなみに寸法です が、フィーリングです。つまり適当(笑)ぉぃぉぃ Sunrise製のSnow plow (スカート)をつけるつもりだったので、いい加減に作ってます。
I was thinking of making the rear deck in the same way, but it was too much work, so I just tore off the rest of the deck from the car and glued it together (lol) The steps on the SDP40F were originally stairs like the one I use. It's not a style, but a ladder type, so if you're looking for realism, you might want to use something like Life-Like's F40PH.Whether it's worth spending that much money is another question.
Essential power
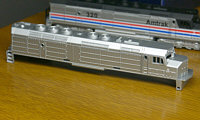
I think it is safe to use power similar to KATO's SD45 or SD40-2.If you cover it as is, the body will become quite tall, so some adjustments will be necessary, such as cutting the inside of the body and cutting the power side.I think it's better to carefully adjust this until you're satisfied.
The ideal power would be a Kato SD type, but personally I think it's a bit impossible due to the cost (lol) So I used the power from a Bachmann SD40-2 that I had left over.The truck is too big.The fuel tank is too small (lol).It doesn't look good, but it was cheap so I'll forgive it (lol)
And finishing paint
アムトラックフェーズ2の塗装も嫌いではないのですが、以前 FP-45のフェーズ2を作ったことがあったので、今回はフェーズ3を選択。どの塗装も作業は大差ありません。まず全てをシルバーに塗ります。アメリカでは Platinum Mistという色を使うのが一般的です。国内では、タミヤのアルミシルバーあたりで良いのではないでしょうか。エアブラシも持ってるのですが、どうも準備 が面倒で、缶スプレーでごまかしてしまいます(笑)ただ、缶スプレーも上手に使えば、結構きれいに仕上がるので、無理してエアブラシ買う必要もないと思い ます。ランニングコストを考えればエアブラシなのですが・・・
Once the silver has dried, mask off the silver part for the black on the roof and under the floor.I use regular Tamiya masking tape.There are no particular curves, so this one is sufficient.Photos of the actual car areAmtrak Photo Archives でチェックすると間違いないです。ほぼ全車両の写真が掲載されてます。(私も何点か提供してます)マスキングで面倒なのは、フロントキャブ(ボンネット) と運転席脇のマスキング。小さく切った細めのマスキングテープでやれば何とかなると思います。マスキングが出来たところで、エッジをしっかり指で押し、隙 間が出来てないか確認します。OKであれば、ブラックを吹き付けます。私は、タミヤのフラットブラックを愛用してます。薄く何層も重ね塗りすれば、隙間に 塗料が流れ込むこともなく、きれいに仕上がります。
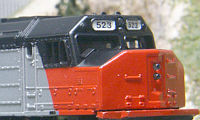
In the case of Phases 2 and 3, spraying ends here.Those creating Phase 1 will paint the "red nose" as shown in the photo on the right.Quick and bright red.Red dries more slowly than other colors, so it's best to spray it thinly and take your time to apply multiple layers. I feel that the shine red in the Mr.Color can spray is close to the real thing.
That's all you need to use paint, the rest isMicroscale DecalFinish with decals.
There are many models available for Amtrak, but the ones that can be used with this vehicle are as follows.
| Amtrak Phase 1 | No.60-100 |
| Amtrak Phase 2 | No.60-191, 60-423 Etc. |
| Amtrak Phase 3 | No.60-362, 60-424 Etc. |
I use Microscale set to apply decals.Microsoft Microscale推奨です。酸っぱい臭いが特徴です。水に浸してはがれたデカールを、set液で希望の場所にセットします。そしてある程度デカールが 乾いたところで、デカールの下に出来た気泡をつんつんと先の尖ったナイフ等で穴をあけます。そして、この穴にMicroset Sol をつけます。このSol液は、デカールを非常にやわらかくするもので、ディテールの凹凸にジャストフィットさせるものです。先ほど空けた小さな穴 は、伸び縮みするデカールが、気泡の影響なくフィットするために必要な空気の逃げ道です。ちなみにsol液をつけた後は、あまりいじらず、自然になじむの を待ちましょう。
Once the decal is dry, spray it with clear coat.
Coupler installation
あらかじめフロント部に穴をあけておいたので、比較的楽だと思います。Micro Trains Line のボックス付カプラーをボディーマウントします。一旦仮取付を行い、カプラーの高さをチェックします。手元にゲージがなければ、他の車両とつないでみて高 さをチェック。たくさんの車両でテストして平均をとればよいのでは。ぉぃぉぃ。もし高すぎるようであれば、フロント部とカプラーボックスの間に薄いプラバ ンを挟んで調整します。
It would be better to mount the rear coupler on the body, but I found it too troublesome, so I decided to mount it on a truck.I looked for a Micro Trains Line conversion kit that matched the power and installed it.
Completed for now
For the whistle, I used the 5-horn type that came with the F40PH.The skirt is made by Sunrise Enterprise ($1.70).Well, that's okay. T.H.
<Additional notes>
In 2008, FP-45 was released by Athearn as a new product, so it might be better to buy that one...Manufacturers these days are pursuing reality, so there is little hope for non-existent Amtrak painted products. maybe.It may be best to aim for an unpainted target.Anyway, this time too, it was a useless modification (lol)
<Additional notes>
A first in the model world?It looks like the SDP40F from Kato will be available in Amtrak paint.It seems better to buy it honestly (lol) Goodbye FP45...lol